meta data for this page
lamaPLC: Max31865 RTD to Digital Converter - PT100/PT1000 Platine
 The MAX31865 is an easy-to-use resistance-to-digital converter designed for platinum resistance temperature detectors (RTDs). An external resistor determines the sensitivity for the RTD used, and a precision delta-sigma ADC converts the RTD resistance ratio to the reference resistance into a digital output. The MAX31865’s inputs are protected against overvoltage faults up to 45V. It also includes programmable detection for RTD and cable open or short conditions.
- Simple Conversion of Platinum RTD Resistance to Digital Value
- Supports 100Ω to 1kΩ (at 0°C) Platinum RTDs (PT100 to PT1000)
- Compatible with 2-, 3-, and 4-Wire Sensor Configurations
- SPI-Compatible Interface
- Voltage for module: 3-5 V DC
Pins
- Vin: This is the power pin. Since the chip operates at 3 VDC, we have included an on-board voltage regulator that accepts 3-5V DC and safely steps it down. To power the board, supply it with the same voltage as your microcontroller's logic level — for example, use 5V for a 5V microcontroller, such as an Arduino.
- 3Vo: This is the 3.3V output from the voltage regulator; you can draw up to 100mA from this if needed.
- GND: Common ground for power and logic.
- SCK: This is the SPI Clock pin, an input to the chip.
- SDO: This is the Serial Data Out / Microcontroller In Sensor Out pin, used for data sent from the MAX31865 to your processor.
- SDI: This is the Serial Data In / Microcontroller Out Sensor In pin, used for data sent from your processor to the MAX31865.
- CS: This is the Chip Select pin; drop it low to start an SPI transaction. It is an input to the chip.
- RDY (Ready): This is a data-ready indicator pin. You can use this pin to speed up your reads if you are writing your own driver. Our Arduino driver doesn't use it to save a pin.
Configuration
- By default, the sensor is configured for 4-wire RTD operation, but can be set for 2 or 3-wire. For a 4-wire setup, leave the jumpers as they are!
- For 3-wire usage: Solder the jumper labeled 2/3 Wire closed and cut the wire connecting the left side of the 2-way jumper just above Rref. Then, solder the right side labeled 3 closed.
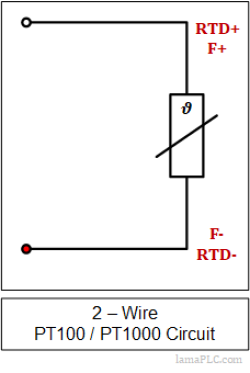
- For 2-wire use: solder the two triangular jumpers below the terminal blocks closed, or connect short wire jumpers between the two terminal blocks on each side (essentially jumpering the two right-side terminal holes together, and the same for the left side).
PT100 / PT1000 sensors
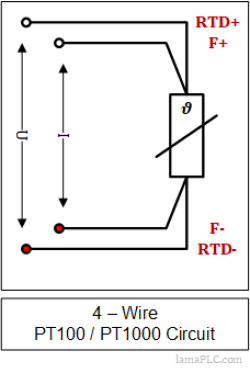
 RTDs (Resistance Temperature Detectors) are straightforward devices: simply a small strip of platinum that measures precisely 100 Ω or 1000 Ω at 0°C. Bonded to the PT100/PT1000 are two, three, or four wires.
Thus, the 4-wire RTD has two wires attached to each side of the sensor. Each wire has about 1Ω of resistance. When connected to the amplifier, the innovative amp measures the voltage across the RTD and across the wire pairs.
For example, the approximate resistances of a 4-wire PT100 RTD at 0 °C are as follows. (For a PT1000, the middle resistance would be about 1002Ω rather than 102Ω).
Connect the two ends of the PT100/PT1000 resistor to the RTD+ and RTD- terminals on the sensor module. For example, a resistance of 102 Ohms can be measured. In a 3-wire or 4-wire setup, the wire connections go to the F+ and F- terminals. These connections might differ from the resistance values of the respective sides by only a few Ohms, meaning the resistance between F+ and RTD+ or F- and RTD- may vary slightly, just a few Ohms.
 Basic resistance values in Ohm PT100 sensors according to DIN/IEC 751
SPI Wiring
Since this is an SPI-capable sensor, we can use either hardware or software SPI. To ensure consistent wiring across all Arduinos, we'll start with 'software' SPI. The following pins should be used:
- Connect the Vin to the power supply; 3.3V or 5V is fine. Use the same voltage as the microcontroller's logic. For most Arduinos, that is 5V.
- Connect GND to common power/data ground.
- Connect the CLK pin to Digital #13
- Connect the SDO pin to Digital #12
- Connect the SDI pin to Digital #11
- Connect the CS pin to Digital #10
Arduino library
To start reading sensor data, install the Adafruit MAX31865 library from the Arduino library manager.
Sources
Adafruit MAX31865 RTD PT100 or PT1000 Amplifier
This page has been accessed for: Today: 2, Until now: 137


